Inspirations

Inspirations
The color you see is the color you get!

Monday, October 31, 2011

Happy Halloween

The end of October already?!?!  Where oh where did the month go?

Anyway....

HAPPY HALLOWEEN!

I have a "boo-tiful" halloween card to share with you today!


I sponged Creative Inspirations Paint "Fairy Dust" along the "too cute to spook!" sheet of paper to add some shimmer.  I also used Lavender on parts of her dress, Citrus on her crown & wand and Silver Frost on the pot.


Have a spooky day!

Kendra

Sunday, October 30, 2011

CI Paints Inspired By: Fall


Thanks to all those who joined in last week and shared their "Halloween" creations!  What some spooktacular creations!!

Remember it is the last Sunday of the month, so that means we will be choosing a winner next Sunday to win sone paints of their own!!

Check the post below to see the Random.org Top 3!

---------------------------------------------

Each week you will be given a challenge to find inspiration in/from what ever the challenge theme is... you can be as literal or abstract in your inspiration as you want....Just make sure you can tie it back to the theme! Challenge closes at 6:00pm Eastern on Saturday.

You will always be able to jump back to the current challenge by clicking the "Current Challenge" link in our sidebar. The rules can always be found by clicking the tab "Challenge Rules" at the top of the page.

You do not need to use the Creative Inspirations Paints in your project, however, if you do, tell us which colors you used, and your name will go in the drawing twice! Each month, one person will win 5 jars of paint in the colors of their choice. The winner will be randomly drawn from all the people who have played that month, so make sure to join in on our challenges each week!

---------------------------------------------

This week's challenge is:

Inspired By: Fall

Here's a card for inspiration:


I used Creative Inspirations Paint "Tan" to add a light shimmer to the raffia.


Have a great week!  We hope you'll share your creations with us!

Kendra

---------------------------------------


Inspired By: Halloween Random.org Top 3

Thanks to those who joined us last week for our Inspired By: Halloween challenge!  What some great projects!  I don't know about you, but I love fall!

Here are the Random.org Top 3 Picks:

Beautiful work ladies!

You each will recieve an extra entry in our October drawing for some CI Paints of your own!

You can grab this badge for your blog:

Saturday, October 29, 2011

fashion statement...

Welcome all my friends!


Are you ready for another fun tutorial?  I thought I would go a little bit farther today than just showing you one technique... instead, I'll share a step by step project too! Ready to get your hands sparkly?

What you need:
Creative Inspirations Paint
White Tulle
felt
feathers
scissors
hot glue gun
exacto knife
flowers/buttons/embellishments
broach pin/ hair clip  (optional)

Step 1: Cut desired length of white tulle. (18-24 inches is good)

Step 2: Cut your tulle to the width you want. (the easy way to do this is by folding your 18 inches in half over and over again until you cut the width in 1 cut.  Tulle is thin, so lots of layers won't affect the cutablility.

Step 3: Paint your tulle. I know it's hard to see, but it really does color the tulle. And yes, you could just buy colored tulle, but then it wouldn't have the shimmer of the CI paints. =)
*I'm using Onyx CI paint*

Step 4: After your tulle is dry, tie it in a bow. Then set aside.

Step 5: Use an exacto knife to cut off the fluffy part on the INSIDE curve of a feather.  (feathers generally have a natural curve in one direction or the other. Remove the inside of the curve.)

This gets really messy, and you will have feather fluff all over your room if you don't keep it under control.. I like to make sure no fans are on, no windows open, and have a lint roller handy to pick up fluff before it can fly away.  =)

Step 6: Using the blade of your scissors, curl the feather along the shaved edge just like you would curl packing ribbon. (this takes a little practice, but it isn't too hard)

Set that feather aside

 Step 7: Paint the smooth tops of 2 feathers.  (don't paint the floofy part, just the smooth top of the feather.)
*I'm using Carmel CI paint*

Allow to dry

Step 8: Curl your dry feather tips, then cut off the unpainted floofy part of the feather.

Gather up your 3 curled feathers, tulle bow, and whatever other embellishments you want to include... (I've stacked a couple flowers and added a button in the middle.)
*that rusty orange flower is painted with Copper CI paint... matches the feathers perfectly, huh!*

Step 9: Cut a small circle out of felt. This doesn't have to be perfect, it will be hidden in the back. You just need it to be a base.

Step 10: Use hot glue to attach your 3 feathers in a cluster on your felt.

 Step 11: Hot glue your tulle bow to the felt circle

 Step 12: Hot glue on any other embellishments you want to hide your felt.

This bow would look dashing as a hair clip, beautiful as a broach, and stunning as a gift topper!

Enjoy!
~Kassi

Friday, October 28, 2011

exciting...

Happy Friday everyone!

I'd like to thank each and everyone of you who sent in an application for our DT call. You all have so much talent! For those of you who didn't make it this time, don't give up!  Join us for our challenges, and let us see you in action! We'd love to see you apply next time!

To those who have been on the team this term, THANK YOU! You girls are amazing, and we will miss all of you that are leaving!

That being said...

I'm so excited to announce our new Design Team!!!  


You can expect to see the new DT in action this November!

~Kassi

Thursday, October 27, 2011

Vampire Costume Bear

Good morning! It's Holly posting today, and I pulled out this cute Vampire Costume Bear from I Brake for Stamps to share with you today.


How adorable is that?? I colored the bear with Copic markers and I used the Copic Texturizing technique from Technique Junkies to give his fur a "furry" appearance. His vest and his "wings" are painted with shimmery Onyx paint (Creative Inspirations Paint) and I used a gold glitter pen to color in his medallion and the stars.


I found some chipboard letters to spell out "boo!" but they had a glossy white finish on them. So I peeled off that glossy paper and then painted the raw chipboard with the same shimmery Onyx paint. You can see the wonderful shimmer in this picture:


Have a safe and Happy Halloween!!

Stamps: Vampire Costume Bear from I Brake for Stamps
Ink: Tuxedo Black Memento
CS: Basic Gray, Black, White
Other: Copic markers, gold glitter pen, black organdy ribbon, chipboard letters
TJ Technique: Copic Texturizing
Creative Inspirations Paint: Onyx

Wednesday, October 26, 2011

Vintage pocket card - Kianel

Hello my dear Creative Inspirations paints friends!
Kianel here with you to share a project i made playing with my stamps and my Creative Inspirations paints!!!
You know how i love to colour stamps and that is just wonderful when you mix your usual ink with a touch of Creative Inspirations paints! Look at those details, so shimmery!!!

Here i used some "fairy dust" on the flowers and butterfly.
To colour the clothes, i used "antique silver" that i mixed with distress refills of faded jeans and weathered wood.
 
And here, on the candle you can see that i used the "tan" and the "mango" colors.

Have a nice wednesday and don't forget to enter our weekly challenge that you can find here, to get the opportunity to grab some fabulous Creative Inspirations paints jars! The theme this week is Halloween, so take a look at it and you can one of my Halloween projects i made with Creative Inspirations paints and jewelled here. Love from France, Kianel.

Sunday, October 23, 2011

CI Paints Inspired By: Halloween


Thanks to all those who joined in last week and shared their "Clean and Simple" creations!

Check the post below to see the Random.org Top 3!

---------------------------------------------

Each week you will be given a challenge to find inspiration in/from what ever the challenge theme is... you can be as literal or abstract in your inspiration as you want....Just make sure you can tie it back to the theme! Challenge closes at 6:00pm Eastern on Saturday.

You will always be able to jump back to the current challenge by clicking the "Current Challenge" link in our sidebar. The rules can always be found by clicking the tab "Challenge Rules" at the top of the page.

You do not need to use the Creative Inspirations Paints in your project, however, if you do, tell us which colors you used, and your name will go in the drawing twice! Each month, one person will win 5 jars of paint in the colors of their choice. The winner will be randomly drawn from all the people who have played that month, so make sure to join in on our challenges each week!

---------------------------------------------

This week's challenge is:

Inspired By: Halloween

Here's a card for inspiration:

I used some Creative Inspirations Paint on the spider web and star to add just a little touch of shimmer!


Let's see your spooky creations!

Have a great week!  We hope you'll share your creations with us!

Kendra

---------------------------------------


Inspired By: CAS Random.org Top 3

Thanks to those who joined us last week for our Inspired By: Clean and Simple challenge!  What some beautiful projects!

Here are the Random.org Top 3 Picks:

#3 Joy

#15 NanaConnie

#10 Faye

Beautiful work ladies!

You each will recieve an extra entry in our October drawing for some CI Paints of your own!

You can grab this badge for your blog:

Saturday, October 22, 2011

tied up with string...

"Brown paper packages tied up with string... these are a few of my favorite things."
~Sound of Music

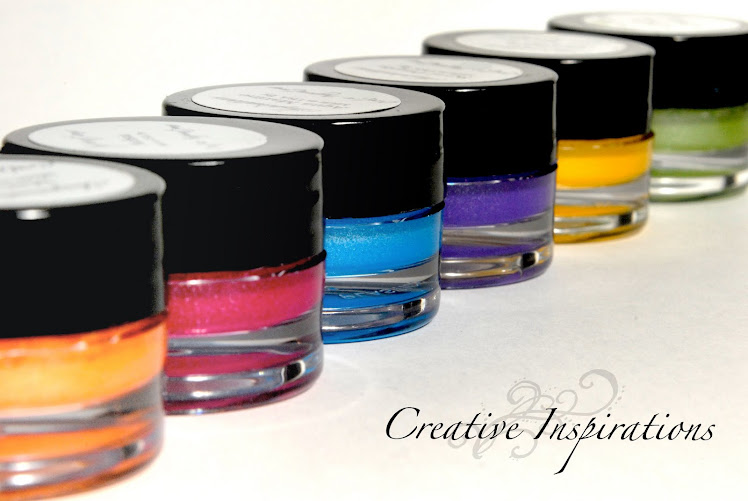
Not long ago, I was looking at a site (ok... more like drooling over a site) that sells beautiful colors of bakers twine.  Bakers twine has become a very popular embellishment, and I must say, I love how it looks with buttons, hand stitching, and in tiny little bows.  I love all the beautiful colors that have recently become available to crafters. What I don't love is the price. The site I was looking at blew me away with the prices... To get multiple colors would have broken the bank (and let's face it, I love color, so how could I possibly survive with only one color?? LOL)

And so... this technique was born.... Yes, it is a bit of work, but your wallet will thank you, you have the advantage of endless color combos instead of 15 or so choices, and it's sparkly! =)

What you need:
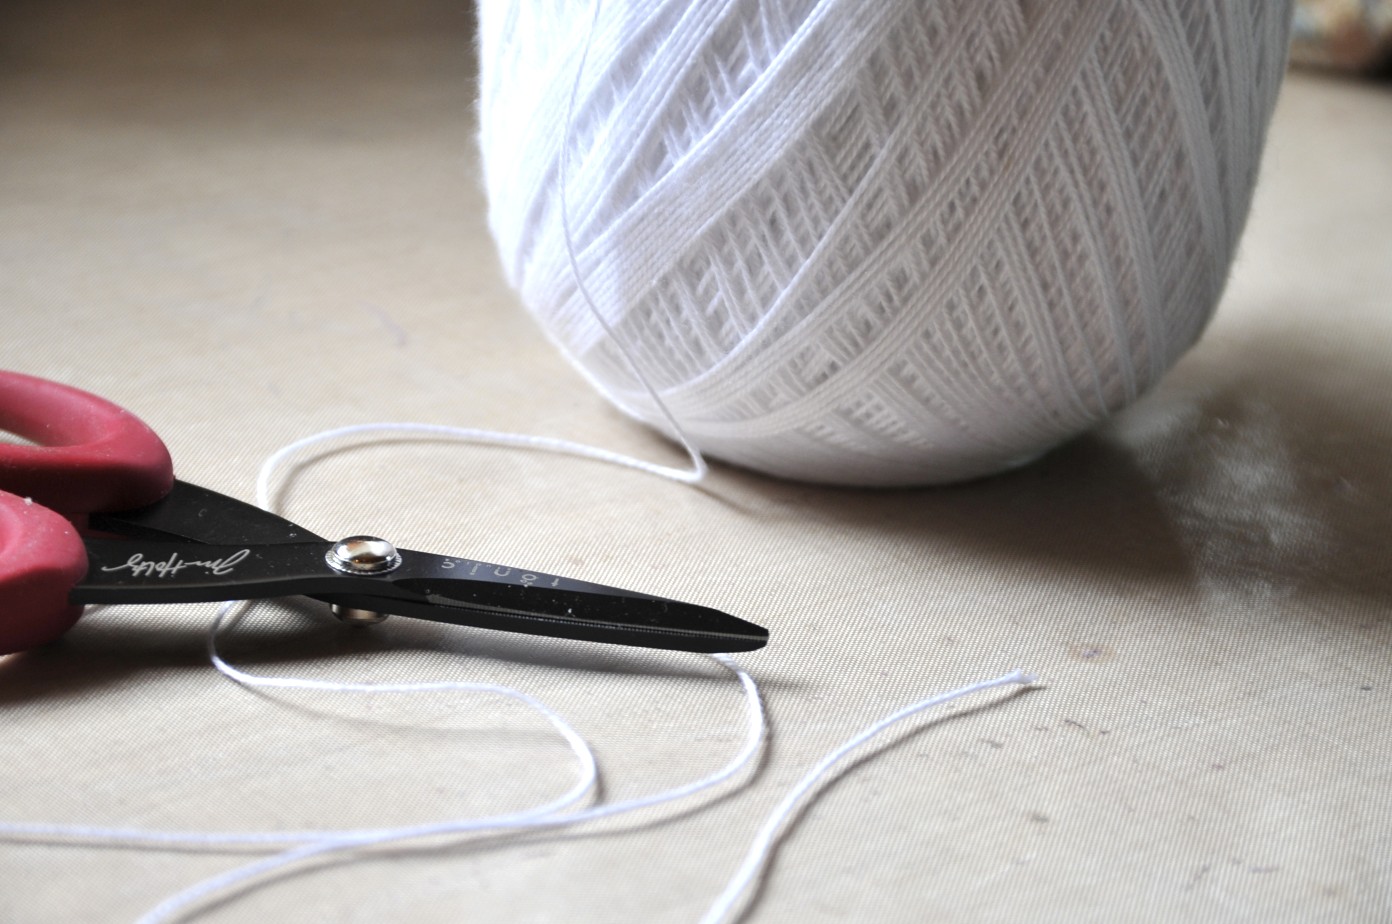
White Crochet thread *
Creative Inspirations paint
Water
Heat gun
Masking tape
Tweezers

*crochet thread is found with the knitting and crochet things in local craft stores and some Walmarts. It is a thin twisted cotton thread that is very inexpensive. 

 Step 1: Cut desired amount of crochet thread from spool. I usually do about 12-14 inches or so.

 Step 2: Carefully separate the twisted strands. The crochet thread is made of 3 twisted strands similar to the way embroidery floss is made up of multiple twisted strands.  The cotton strands are easy to tangle or break, so do this slowly, one strand at a time. (if you have ever done embroidery, this should be second nature!)

 Step 3: Make a puddle of Creative Inspirations Paint on a non porous surface, and add some water. This is a lot easier if the paint is juicy instead of thick. 

 Step 4: Run your first strand through your paint puddle.  By pulling your thread through the puddle, then under your finger, you can squeeze out the extra paint, although, you tend to get messy that way... 

Step 5: Traditionally, bakers twine is candy cane striped with 2 or 3 colors. Repeat Step 4 with the 2 remaining strands and desired paint color(s).   

*yes, it is important to paint all 3 strands even if you want some of them white. Use Winter Frost or Fairy Dust, but paint them!

 Step 6: Carefully dry each strand. Use Tweezers to hold your strands without burning your fingers. Keep the heat moving so you don't burn your strands. To avoid color contamination, dry each color separately.

 Step 7: Hold one end of each strand in your fingers and gently twist. Tape this twist down to a secure surface with masking tape.  Continue twisting the strands back together until you have reached the end. This part reminds me of making friendship bracelets back in elementary school. =)

 Step 8: While holding the end of your twist to keep it tight, run your heat gun slowly over the length of your string. You do need to be careful with this step since cotton can burn.  If you watch closely, you will see the strands shrink and tighten up against each other. 

You now have a fabulous, perfectly coordinated, sparkly, CHEAP, homemade bakers twine.  I like to wrap mine around small pieces of chipboard or those little cards made for embroidery floss... this keeps them from getting tangled and makes storage a breeze. 

*like any twisted thread, the strands sometimes start to separate again... just re-twist, and reheat. 

Enjoy!

Friday, October 21, 2011

who's got the button...

Good morning everyone!

Ready for another quick tip?  

Why don't we talk for just a second about BUTTONS. 

You know, those fabulous little things that hold your shirt together and adorn so many crafty projects... They sure are a popular thing, and I'm not complaining. I inherited a love of buttons from both my mom and my grandmother. =)

Sometimes, buttons work perfectly on your projects just how they are.... Other times, stringing a little baker's twine through the holes and maybe tying a cute little bow is the perfect touch.... But what about those times when neither one feels right? 


Why not try gluing your favorite color Metallic Accents to the center?  It adds a pop of color, practically no extra bulk, and it is a quick way to give your buttons a "finished" look!

When I do this, I use Ranger's Glossy Accents to adhere the Metallic Accents to the buttons. This way I know that they won't go anywhere.. even in the mail.  

Enjoy!

Thursday, October 20, 2011

Celebrate

It seems as if I'm up to my eyeballs in getting ready for a craft show but I took a little break today and created this quick card.   I used 'Garnet' and 'Green Olive'  (beautiful Christmas colors!) to paint the wreath and then added some red 'Metallic Inspirations' on the ribbon and sentiment.  I love the festive look of red, green and white!

So now it's back to some assembly line creating!  Hope you have an awesome day!

Tuesday, October 18, 2011

Happy Holidays

This week the challenge is to create a CAS card. Since the holiday season is upon us, I thought I'd try my hand at a holiday card. To keep with the holiday spirit, I started with a silver panel and with an embossing folder, I dry embossed the frame on the panel. The bird is an outline sticker. I used Creative Inspirations paints in copper, garnet, and evergreen to color him. The sentiment is a rub-on. As a result, I have a very shimmery and festive, but CAS holiday card.
Barbara Washington -- Designer

Monday, October 17, 2011

Hello My Friend

Happy Monday!


I really like altering my papers with CI Paints!  I just love the added shimmer you can give ordinary plain papers.  In most cases shimmery and glittery paper are more expensive.  But with the endless possiblities of uses of CI Paints you can add your own shimmer to any paper.  I know this has been mentioned before, but we like to remind you that.  It's so simple to add shimmer to your papers.   And most importantly it dries fast and doesn't wrinkle your paper!  It looks professional! :)

The paper was first embossed and then I sponged some "Burgundy"
I really like the added shimmer it gives the paper, as well as the sponged look. Using a sponge to put the paint on paper is one of my favorite ways to add the shimmer to paper.


The finished card:


More close-up of the shimmer:

The inside:
I also used a touch of chocolate on the flowers, in which I added using a fine paint brush.

Have a nice day!

Kendra